Moved!
This blog will be continued on
http://art-and-experiments.blogspot.de/
However you can still find past posts here in the blog archive.
The Blue Box

It’s markers again, this time combined with neocolor II watersoluble wax crayons made by Caran d’Ache, on watercolour cold pressed paper.
Happy Colours – Finished
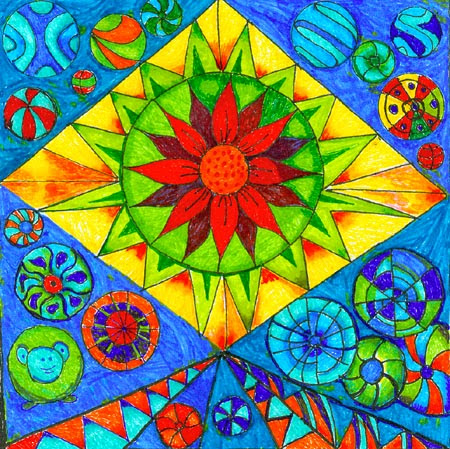
This is the final version of the “Happy Colours” piece. I used Stabilo and Staedtler pens and drawing cardboard as support. All in all it took more than a week to do it – either in the morning at the breakfast table or in the early evening when I had returned from work.
Water Elf – making progress

Water elf – still work in progress
Some days ago I bought my first Shin Han Touch marker. It’s got the colour name “Seaweed green”. I used it to paint the leaves on the head of the elf, and the leaves on his arms. You can get various shades of it when you use a blue marker first and then put the seaweed green on it, or you can even blend it with a lighter green.
While I was working on the elf I noticed that my “spectrum green” copic ciao was used up. Of course copic offers refill inks in all shades, but I will go and buy a Shin Han Marker to replace the copic ciao. Shin Han also has a “spectrum green” in their colour palette.
Yesterday my friend Claudia and I did the framing of my paintings for the Group Art Show on Saturday. I was again impressed of the difference a frame makes. I also realized how much art I have been doing for the last year, and how many mediums I had tried: acrylic paints, soft pastels, markers and coloured pencils. Of course I am still a bit anxious about showing my art pieces, but this time I definitely am more relaxed than last year. Indeed I am looking forward to Saturday!
Pansy painted with Markers

Pansy. Copics and other Markers. June 2014
I am still experimenting with the paper. I used the same line drawing which I used for my digital painting.
It’s markers again!

The dragon snake. Layout markers on paper. May 2014
Did I tell you about my self-made light table? Some weeks ago I bought a glass pane for about 5 Euro, planning to put it between to big boxes from IKEA. Up to the weekend that glass plane hadn’t been used, but suddenly I felt that I had to to it. I took one of my quick and rough ballpoint sketches and a piece of very smooth paper which I also had been given a month or so.
I had to sit down on the floor in order to use the “light table”, but that wasn’t the problem. The problem was the smoothness of the paper, and I had to be very, very careful with my ink pen to prevent smudges. Then I grabbed my markers. Blending on the smooth paper was done quite easily, but I had been to impatient to colour – some of my ink lines blended with the copic markers!
However, I learnt a great deal about the importance of the paper for the way the copics and the other markers performed. The colours are much more vivid on a smooth paper, and now I know that you can blend them.
Easter bunny Lunchbox
This design is based on a digital painting I did with photoshop quite some time ago. I think it fits nicely on the lunchbox…
Here in Berlin we are having spring temperatures in January, whereas other people suffer under extremely low temperatures.

Happy Holidays everyone!
Two days and we’ll have Christmas Eve. I wish everyone who’s following my blog or who’s dropped over from some other place
Happy Holidays with your family and/or your friends wherever you may be!
Have a great time!
Inkscape Tutorial – Blur and Clip Technique
As you might have seen in some of my blog posts I am doing quite a bit of vector artwork in Inkscape. There are a lot of very helpful video tutorials on YouTube, and one of these is presented here. It is easy to follow and gives an introduction to many of Inkscape’s tools.
By the way, the next blogpost will be on Wednesday, 30 October. I am leaving Berlin for a few days in order to meet with my family in the South of Germany.
Another horse portrait

Horse portrait. Digital Drawing done with Artrage. Ulla Hennig March 2013
This is the second of my horse portraits which I did with the pencil tool in Artrage and my graphic tablet.
In the beginning it is a bit strange to draw on the tablet and look on the screen to see your strokes. However, the more I practise it, the better it goes. I also noticed that drawing from a photo reference makes you see things you would not if you would not be drawing it – the distance between the ears, the size of the eye, the size of the muzze, the exact position of eye and ears and so on. And sometimes I won’t notice flaws until I upload the drawing …

